Pwneroni
Smash Lord
- Joined
- Sep 26, 2008
- Messages
- 1,065
The purpose of this thread is to make an archive of all Wario's advanced techniques. There are a lot more than people realize, and it would be a good idea to keep track of all of them! I thought of doing this a while ago, but then forgot all about it in a blissful month with my girlfriend Mary.
Now, I could use everyone's help making a list of all the ATs out there that Wario can do! All the way from basic ones like DACUS to advanced ones like Bike 360s and awesome tire stuff! I") decided to include tire combos as well, and these aren't any old regular combos. Only strings either guaranteed or almost guaranteed can be included.
decided to include tire combos as well, and these aren't any old regular combos. Only strings either guaranteed or almost guaranteed can be included.
Oh almost forgot! To help new Wario players, I'm aiming to explain how to DO all the ATs also. I remember one time, I tried playing Sonic for a while. When I went on the boards to look at his ATs, there were a million and one but none of them were explained! A small write-up (like a paragraph or two), detailing the inputs, timing and useful situations would be great for each one
Vids too, I daresay? Wario exclusive? :O perhaps for the more complex ones heh.
Basic Techniques
Tire or Bike Techniques
More Complex Techniques
Special Buffered Techniques
1. DACUS*
2. **** DI
3. Edge Crashing
4. Platform Canceling*
5. Instant Throwing
6. Glide Tossing
7. Zibble Dropping*
8. Platform Drop Jumping
9. Platform Drop OoS
10. Buffered Dthrow Chaingrab
11. GTEX DACUS*
12. Optimal Breaking of the Bike*
13. Buffered DACUS
14. Chopper Hop
15. Bike Loops!*
16. Airdodge [Item] Drop
17. Z Catching
18. Footstooling
19. Stutter Stepping
20. Quarter Circle SDI
21. Dthrow to Buffered Dtilt
* = video or tutorial available
New Addition: The Tire Section (in the second post slot)
1. ---Dash Attack Canceled Up Smash (DACUS)---
About the DACUS:The DACUS is a moderately useful technique, utilized by many other characters than Wario. Wario's DACUS is on the quicker side, so you can use it to tech chase after throws or hits, and you can punish MK's tornado if the opponent tries to poke in then pull back. The downside though, is the Usmash itself is fairly easy to SDI. If the opponent is competent at Smash DI, then they will have little trouble getting out of this hit. However, you can use this to your advantage! Opponents who try to punish may still find you out of their reach, and you can punish with a grab, Ftilt or Fsmash!
How To Do It
Wario's DACUS is quick, and so are the inputs. Do an instant Dash Attack by dashing and hitting down on the c-stick. RIGHT immediately after you Dash Attack, hit up on the control stick and press z. I'm talkin really fast here. Before the dash attack even comes out, you have to be pressing up and z. You can hold z to charge the smash, trading the fluidity and quickness of the move for a bit of extra distance.
Thanks to 1337PGN for this helpful video on DACUS!
2. ---Having Super **** DI---
About Kick-*** DI: DI is a fairly basic and awesome technique! It maximizes the survivability in lots of different scenarios, most notably the predictable smashes that Wario has to face out of grab release. EXTREMELY USEFUL to a Wario player, I urge you all to practice this with a friend in training mode. In this lesson, we will explore a little on how to survive smashes with maximum effectiveness.
Basically when you get hit, there is a window where you can Smash DI. If there is more than one hit, you can SDI each one! DI uses both the control stick and the c-stick, SDI'ing the initial hit and circling to DI with the control stick while monentum canceling with the c-stick. Let's go step by step.
How to do it: Okay let's say you just got grabbed by Bowser, and he's going to hit you with a grab release to Usmash. Here comes the grab release, aaaand boom he starts his Usmash. Now you should be waiting for that Usmash, because you have to be quick. RIGHT when he hits you, Slam both the control stick and the c-stick diagonally downwards, opposite of the way you're going to DI, at the same time. You should see yourself teleport downwards. Now immediately circle the control stick to the left or right (depending on which way you want to fly) for conventional DI, and mash down on the c-stick for your momentum cancel (Dair in this case). Remember, the movements must be really quick! Slam both the sticks down, and immediately move them to their proper positions for DI. Practice this a lot, it can only do you good
You can survive Bowser's Usmash until 118% exactly using this method on FD.. Learning to SDI helps a lot in these scenarios! It can help you get that extra space for surviving to higher percentages. Like SDI'ing down and diagonal left, then quickly circling to DI to the right. Makes the heavy Frenchman even heavier heh heh.
3. ---Edge Crashing---
About Edge Crashing: This is a technique used to safely crash the Wario Bike onstage, allowing you to make use of it to acquire tires, throw the bike itself, or get on and ride it again. This is very useful on many stages, as obviously the bike is a wealth of potential in itself. More on that later. Much more.
This technique is great, because in edgeguarding scenarios it puts you in great position to throw the bike out at the opponent. It is pretty quick and fluid, and once you practice it you can seamlessly incorporate it into your playstyle.
How to do it: This technique is pretty simple. Let's do it on a simple level: Smashville. Start right at the edge of the stage, run off and bike towards the stage. Make sure you drop a tiny bit, but not too much. The end result is Wario and the bike both end up on the ground right next to each other. If you crash and fall down, that means you've fallen too far and must bike a little faster. If you just ride onto the stage, that means you haven't gone down far enough and must go a little bit further. The distance is pretty lax, not strict at all.
On some levels with weird edges, Edge Crashing requires more strict timing or is impossible altogether. Some examples of weird edges are PS1, Yoshi's Island and Lylat Cruise.
More advanced versions of Edge Crashing are simply crashing the bike successfully without preparation, in the midst of battle. It is very intuitive and easy, a gateway into the wonderful world of Wario's motorcycle!
4. ---Platform Canceling---
About Platform Canceling: Only useable on levels with a moving platform, this technique has yet to be explored by Wario players. Basically it involves jumping up to a platform, and canceling your Dair before it even comes out. The end result is an instant landing on the platform, rather than jumping above it and landing. It can increase the speed of your game if you do it right, but at the moment it is a treasure chest of untapped potential for Wario.
How to do it: The easiest level to do this on is Smashville, where a flat moving platform is present. Start below the platform on the ground, and fullhop up to the platform. Right as you are ascending through it from below, hit down on the c-stick to start your Dair. The objective here is to land on the platform before the Dair ever comes out, thus canceling it into an instant landing. It is possible to do this with other aerials, but Dair is easiest because it auto fast falls.
It is possible to do this at any point, you don't have to be on the ground to do it. You can Platform Cancel whenever you want, you just have to fast fall an aerial at the right point. The timing is fairly strict, but it's no Street Fighter 4. Wario has very little lag when he successfully pulls this off (as much as he would have with a regular landing). Common stages you can do this on are Smashville, Yoshi's Island and Lylat Cruise.
The most useful thing I've found for Wario is Platform Canceling out of a ledge jump. When the moving platform is above you, ledge jump and Dair at the right time. Anyone wanna explore this one?
Credits to StarChileRoan for this video on platform canceling!
5. ---Instant Throwing---
About Instant Throwing: This technique is a really great one to learn if you want to get good with tires. It allows you to instantly create a hitbox, throwing a tire instantly as you come near it (it cuts out the time of you picking up the tire). You can give still items movement, throw back items thrown at you, and really it's great for speeding up your game and adding some flash to it. Works with any item!
How to do it: The timing is a bit strict on this one, but very intuitive and easy once you get it down. Easiest to do with L and c-stick (assuming you have vanilla controls). Let's say there is a tire bouncing on the ground in front of you. Jump and airdodge to catch it. Notice how you instantly catch the tire, then go through with the entire dodge animation. The goal here is to cancel the airdodge with a throw exactly as you catch it.
Basically you have to press dodge and c-stick in a direction almost at the same time. Jump and dodge to catch the tire, then flick the c-stick down immediately after you dodge. If successful, you should instantly grab the tire and throw it down! A great place to practice this tech is on Shadow Moses Island. The walls on either side make a great place to play with tires, since if a tire is in motion it won't disappear. The walls keep the tires in, so basically one tire will last you forever! Practice throwing and catching against the walls, ground, keep practicing till you get it down!
6. ---Glide Tossing---
About Glide Tossing: A technique developed fairly early in the metagame. It involves canceling a roll animation with an item toss, giving you a boost. Really useful for characters that can spawn their own items (Peach, Diddy Kong, ZSS, ROB, Wario). Not everyone has one, but Wario has a pretty great one! His long throw animations detract a little bit from the usefulness of this AT, but it is still useful nonetheless.
How to do it: To do this with Wario, you must have an item in your hand. Any item will do, in this case we will use a big tire. What you have to do is roll, but right as you roll you have to toss the item with either the control stick and A, or the c-stick (In this case we will use the c-stick). The timing is very tight, you almost have to press roll and hit the c-stick at the exact same time. If you miss the timing, Wario will still throw the item but he will go a very very tiny distance.
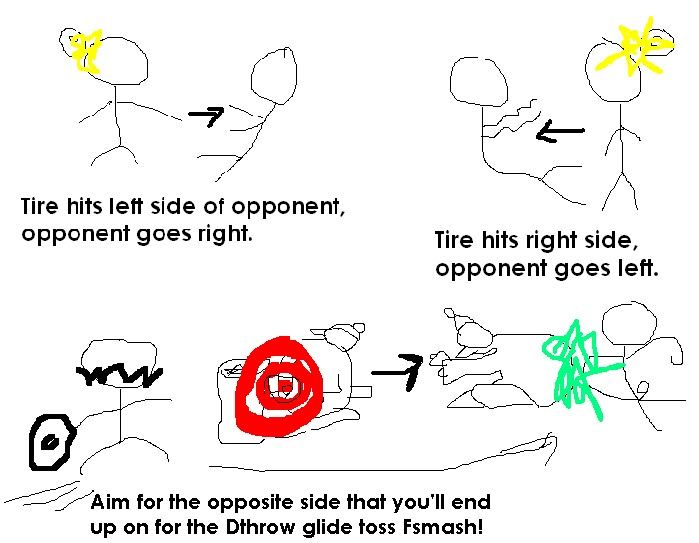
The Dthrow glide toss is arguably the most useful one, since it is the quickest to come out and has the least amount of lag. A really awesome thing to do is glide toss a tire down and Fsmash the opponent from behind. More exploration needed!
7. ---Zibble Dropping---
About Zibble Dropping: I found this AT the other day when I was practicing with tires, and it seems to have a good deal of potential. I dubbed it "Zibble Dropping" because it is a tire dribble and involves the Z button. You do this tech by shorthopping and throwing the tire down (either big or small) and then buffering a z catch immediately. The end result is another hitbox being created after the initial dthrow hitbox. This means that you can hit with a dthrown tire, Zibble drop and make the tire have another hitbox. Loads of potential
How to do it: Very simple and easy to pull off! Grab a tire, any size will do. Be warned that while you can do this tech with either size, only the big tire can be Zibble Dropped after you dthrow it to hit someone. Do a shorthop and dthrow the tire, buffering a z catch as you throw. The buffering window is really huge, so timing is very easy. There is a weird point where when Wario tries to z catch something, if the item is just at the right range below him, it will instantly catch the item, drop the item and airdodge. Dthrowing the tire puts it right at this point heh (destiny anyone? xD) You can Zibble Drop after you hit someone with a shorthop dthrown tire, creating another hitbox for the tire. Very useful!
Example of a combo: This one I made up is called Pinball Wizard (thanks to t0mmy for the name). It makes use of two tires, as well as the Zibble Drop. To start, a tire (either size) has to be bouncing behind your opponent. Shorthop and dthrow the (big) tire at them. After it hits, Zibble Drop and start an Fsmash. The opponent should get hit with the first tire, then get hit with the tire bouncing behind them. Then they will bounce towards you and get hit with the Zibbled tire. Unleash your Fsmash. Does around 40% and looks cool as hell works at any percent since the tires have set knockback. More to come!
A Zibble Dropping Tutorial by Pwneroni
8. ---Platform Drop Jumping---
About Platform Drop Jumping: Wario's slow jump keeping you down? His jump from the ground is 6 frames for the start-up, airborne on the 7th frame. This is very slow (most characters jump on frame 4-6, Bowser is the slowest jumping on frame 8), and sometimes it can leave you at a disadvantage. By utilizing a platform drop (1 frame) plus double jump (1 frame also), you can significantly speed up your jump!
How to do it: A platform is needed, any one will do. Basically you are just dropping down through the platform, and jumping at the first possible frame. It's a really quick movement, and if you do it right you should hardly fall through the platform at all. The double jump disk should be above the platform you're using, and you should be free to do any aerial that you like! If you do it perfectly, Wario's jump will be cut from 7 frames to 2 frames. You cannot short hop or full hop, as you are using the double jump and can only jump that distance.
Exploration is needed for this technique! Especially if you pair it with a platform drop out of shield, this could be an amazing step for Wario in terms of jumping speed, out of shield options, follow ups and surprise attacks!
Example use: MK is Dair camping from above, fairly close to you. Normally he has enough time to Dair then jump away because of your slow jump. Platform drop jump to Uair for a quick punish before he can pull away! Haven't tested much out, testing needed!
9. ---Platform Drop Out of Shield (OoS)---
About Platform Dropping OoS: Similar to the Platform Drop Jump, this AT is a tad bit more difficult to perform. However, it's uses far outweigh any potential complaint like that! It gives Wario a really great out of shield option while he's on a platform. Normally, if pressured from below Wario is kinda out of luck. His jump is his best option to get away, and that's 7 frames plus more for shield dropping. That means getting away will take forever!
With platform drop OoS, Wario now has a really quick option available to him! The platform drop OoS is similar to the regular platform drop, in the fact that it only takes 1 frame! Way freakin faster! Pair that with a Smartfart and you have a 6 frame OoS option 0.o WOW! Now the difficult part is pulling it off, which brings me to...
How to do it: This technique could be done in both Melee and 64, but it was significantly easier. In Brawl, it's just as simple as pressing down while in your shield on a platform. However, the movement on the control stick is very precise! If you press down too hard, it will input a spotdodge. If you press down too softly, it will just angle your shield downwards. You have to tilt the stick down at the exact right pressure, and you will do a platform drop oos! Practice, practice practice!
Uses for Platform Drop OoS: Let's say Snake or D3 is standing below you, and you are on a platform above them on Battlefield holding your shield. Boom, they try an Utilt against you, and you successfully shield the blow. Normally, you're stuck in shield stun for 8 frames, a shield drop (7 frames) to platform drop attack will get shielded and punished. Normally such an attack is unpunishable. Normally.
Shield the Utilt, platform drop oos to fart. Utter destruction. If you don't have a fart ready, substitute in a Bite or Uair! Not sure if those would hit, but as always it could use more testing!
Next step.... Perfect shield to platform drop OoS Smartfart. I'm gonna call that one Greased Lightnin'. Couldn't resist
10. ---The Buffered Dthrow Chaingrab--- *Brought to you by FICTION!*
About the chaingrab: Wario's Dthrow is great and very unique. It has property unlike many other grabs; it has a set knockback PLUS you have a very slight frame advantage. Using these two properties together, you can chaingrab many characters by buffering in a turnaround regrab! It may sound daunting, but the point of this thread is to make stuff like this accessable to everyone!
A lot of these are in a specific percentage range, and keep in mind that staling out your Dthrow is required for specific characters. Staling the Dthrow means that the more you use it, the less distance it will put them away from you. The change is very small, neigh unnoticeable to the naked eye. In a frame perfect world though, every pixel counts. Take Falco for example... technically our chaingrab on him starts at 53% right? You can actually successfully start the chaingrab at 73% and still keep going along with the chaingrab. However, if you try to chaingrab Falco over 73%, he can get away because your Dthrow is not staled enough. If you practice this chaingrab in training mode, you can only go up to 73% since moves don't stale in training mode.
List of chaingrabbable characters in progress... credit goes to K Prime for confirming the exact percentages! The original thread is ---HERE!!!--- and his original blog on AiB about it can be found ---Here!!!---
Falco - 53% to 120%
Donkey Kong - 0% to 100, 110% to 145%
Bowser - 0% to 180%
Falcon - 0% to 70%
Wolf - 59% to 200%
Ganondorf - 0% to 90%
How to do it: I would tell you how, but our good old friend Fiction (Best Wario Ever) has kindly posted EXACT instructions on doing the chaingrab. Thank you Fiction, and all credit for this section goes to Fiction.
About the GTEX: Wario's Glide Toss is becoming more and more dynamic and useful the more it is explored. Especially the Dthrow glide toss, which has the smallest amount of lag of all the glide tosses. Pairing the distance of the glide toss with the distance of the DACUS, Wario can literally FLY across more than half of FD in a few quick moments! Doing this allows you to cover massive amounts of ground very quickly, and it's as simple as combining two ATs! :D
How to do it: This is quite simple, really. All it requires is a long tire glide toss (Dthrow is good for this one), then you just input a DACUS at the soonest possible time available! Remember, the Dthrow glide toss's timing is pretty strict, you basically have to push the shield down, control stick over and the c-stick downwards almost exactly at the same time.
Video Tutorial: Tires Give You Mobility!
*New Discovery!* - A regular Dacus can be replaced with a Buffered Dacus, or bDacus for short. This increases the speed of the GTEX, since it is the fastest possible timing! Thank you to S!C for this helpful information!
12. ---Optimal Breaking of the Bike---
About Breaking the Bike: Many Wario players know of the great tool Wario has, or are soon discovering it: Tires. Tires are great for stage control, traps and combos. They give the fat man the range he so much desires, but one must ask: how do you get these tires? Well that's an easy one, pull out your bike and hit it! Once the bike is destroyed, the two tires fly outwards onto the stage for you to grab. Now that's the basic idea, but we're going to take it a step further. What is the most optimal way to get tires?
There are literally hundreds of ways you can break the bike, and to determine which one is best for you, you must step back and think. Every time you hit the bike, it counts as a hit against a character. Thus, you can unstale your strong moves by hitting the bike with unused moves! There are fast ways if you need tires quick. Tires flying all over the place, even off the edge into the abyss? The move that breaks the bike determines the trajectories of the tires when they fly out! Edgeguarding? Yes, there's **** ways to cover multiple recovery options using the bike, and bring down it's hp at the same time!
The first basic step is getting the bike onto the ground. The fastest way to do this is to do an Instant Wipeout, meaning you pull the bike out and instantly crash in place. Nobody really knows how to do this consistently (if you do, let me know!) though, so until then Edge Crashing is the fastest and most consistent way to get your bike out. The next fastest is pulling out your bike and immediately jumping off, putting you in the air and your bike will keel over after it rolls for a bit.
Optimal Bike Breaking for Unstaling Moves
-Dtilt, dtilt, dtilt, repeat. Dtilt is farily weak (about 9% fresh), so you can hit the bike multiple times with dtilts to unstale your moves. A little bit hard to space, you have to be at the right range or you will A. miss hitting the bike or B. pick it up and carry it. Obviously you don't want that to happen as it might leave you open to be punished. Can also use Utilts, easier because there is no danger of accidentally picking up the bike.
-Nair2, Nair2, Nair2, repeat. The second hit of Nair counts for 1 move stale spot, and it only does 3-4% damage! If you have some spare time, use the second hit of Nair to unstale your strong moves a ton! Plus it's really quick, so your chances of getting punished are smaller.
Optimally Fast Bike Breaking
-Full Dair -> Utilt. Every hit from the (fresh) Dair must hit, then an Utilt will break the bike. Utilt is great because it's quick, medium strength, and most importantly it pops the tires right out in front of you. Utilt is definitely one of the best moves for last hitting the bike!
-Shorthop dthrow tire -> Uair. Important not to fastfall the clap, because it won't hit the bike if you do. This way is probably the fastest possible way to break the bike out of all of them. The Uair must be fresh, if it is staled at all then the bike will have a very tiny bit of health left. Uair is similar to Utilt, in that it puts the tires near you within easy reach.
The Bike on the Edge
A great way to get your bike on the ground quickly is to edge crash. This also puts you into a great position if you are edgeguarding your opponent. If you send them flying at high speeds off the stage but you know they won't die, think ahead and crash your bike on the edge. Now you have a very large tool to cover a VERY large area of space with a huge hitbox! Try Uthrowing the bike and grabbing the ledge. Effectively, both options are covered and recovering will become much more of a hassle for your opponent!
Every time your bike bounces (including bouncing on an enemy's head), it's hp goes down. Uthrowing the bike on the edge is very good against characters like Marth, Lucario, Olimar, Charizard, well the list goes on but basically anyone that can't fly, or has a crappy fly. If someone is hit with the bike while it's bouncing, it does around 12-15% per hit to them. That's right, I'm not even joking! The bike can also hit them multiple times, resulting in MASSIVE damage!!!
Keep in mind that Utilt and Uair are possibly the most useful "last hit" for the bike, as they place the tires very near you and with little movement. Do some exploration yourself, and see if you can find even better ways of breaking the bike!
Thanks to Krystedez for this helpful thread about "The Krying Chopper"
Thanks to TheRealBobman for making this AWESOME Wario guide on Allisbrawl! Part 3 is all about the bike, very useful information about the bike's priority, hit points and stuff like that!
Video Tutorial: Tires Give You Mobility! The bike breaking section is near the end.
13---Buffered DACUS (bDACUS)---
About Buffered DACUS: The bDACUS is the next level of DACUS usage. It basically means you buffer in a DACUS out of lag, so it does the move ASAP. This allows you to be frame perfect, increasing your overall speed that you can do the DACUS! Simple in theory, fairly simple to input as well! Has great potential for combos, follow ups, traveling across the stage and quick attacks.
How to do it: While similar to the DACUS, it is an entirely different input. When you do a move (any move will do! Examples include Nair, Spotdodge, Glide Toss, Uair, any move's lag really), you have to buffer a dash Usmash, and then another Usmash within the 10 frame buffer window. Simple in theory, you just have to have really quick fingers to do it. Press over on the control stick and up on the c-stick, then hit up on the c-stick again REALLY fricken fast when you're in lag or out of a spotdodge. Try it out for yourself! Oh and a special note, you have to be facing forward to do a bDacus.
LOL I found the best bDacus! Better than I can do atm, it's even Wario exclusive! Credits to BrawlHumpy for this awesome vid!
14.---Chopper Hop--- *Brought to you by Krystedez!*
About Chopper Hopping: Originally discovered by Wario Bike Magician Krystedez, this is a simple technique that creates airborne movement very quickly from a stationary bike. It's great in situations where you need to reposition your bike, and at the same time be safer than just getting on the hog and riding away. Krystedez has written up a great explanation of this tech all credit goes to him!
Originally Posted by Krystedez
"from your description"...
Omgosh, you know what, just do it yourself? Mhizzle did it.
Let me explain CAREFULLY.
You have a bike next to you. YOU'RE NOT RIDING IT. It's just laying there. You think you can do one of two things that involve handling the bike:
Ride it.
Pick it up and throw it.
But, you think... "I wish I could have it in the air right now with me on it... I could smack that guy over there with it while he jumps at me... I could even just move the gosh darn thing because it's not good in the middle of the stage... Since it's on the ground, I can't do that until it's gone and I just pull it out of thin air with foward B in the air..."
But then, you realize something...
"Wait, I'm the great Wario! I can do anything! Who cares if it's on the ground already! I'll ride into the sky with it anyways!"
You can't:
A. throw it, and jump on it in midair, brawl's physics do not allow that...
B. Ride it, and THEN jump... Again, brawl's physics, plus the fact you can't jump with your bike while riding it, you just jump off :|
So what do you do?
C. Short hop very fast while at the same time reaching for your forward B motion in order to ride the bike.
IF YOU PICKED C.... The result is Wario jumping onto his bike just like he would when re-riding from the ground, ONLY HE JUMPS INTO THE AIR AT THE SAME TIME WHILE RIDING IT. It's like he kicks himself AND the bike into the air while riding.
Get the picture now? If you don't, I'm sad. If you already know about this, good, I'm glad, because I didn't, and now I do. Didn't find immediate use for it until I used it in finals at a tournament, it helped me get it on top of the platform in Yoshi's Island without damage in the bike by just throwing it up (it takes hit points each time it bounces off of the ground or lands on the ground from throws I believe)... This method is like this:
Chopper Hop -> jump off, bike is now thrown in the air by riding it without taking its HP or picking it up. It's like a lagless throw just as much as an bike boost jump.
Full Chopper Hop: It has been discovered that you can add to the height of your chopper hop by using a full jump instead of just a normal jump! To do this, you will need to hold the jump button and hit side B all within the normal Chopper Hop input window!
zxz was kind enough to record a video about all the different ways to utilize the Chopper Hop! Thanks xzx!
xzx presents a Chopper Hop video! (substitute the name "Double Jump Chopper Hop" for "Full Jump Chopper Hop")
15. ---The Bike Loop---
About the Bike Loop: Also known as Bike 360s, or the more famous "Forbidden Technique" made popular by Masky, this is an actual legit glitch in the game. It involves spinning Wario's motorcycle around on a platform, much to the enjoyment of spectators and players alike! Doing a Bike Loop during a match is guaranteed to get you a few laughs, even more if it's a money match or tournament set! Just don't get too carried away xD
How to do it: Okay, here's the real meat and potatoes of the Bike Loop section. Performing one is actually quite simple, you just have to get the timing down. The easiest place to start is Smashville, on the moving platform.
- Board the platform, and wait till it gets all the way to one side.
- Then, when it starts moving, bike away from the platform's path and turn around immediately. You should at this point be going very slowly forward on the motorcycle in the same direction the platform is going.
- As you near the edge of the platform, your front tire will start to dip downwards. Don't panic, this is supposed to happen.
Now is the crucial point. When you see Wario stutter a bit on his bike all glitchy like, flick up on the control stick. It's only for an instant, but the timing window is very obvious. All you need to do is flick up and that's it! ZZOOOOOOMMMMMMMmmmmmmmm!!!!!! You've done it! Yeeeeaaaaahhhh!!!!
You can do a Bike Loop on any level with a floating platform on it. This is level 2 Bike Looping, because the timing and inputs are a bit different than on Smashville. All you do is pretend that you're going to Edge Crash, so run off the edge, but fall a little bit further before you bike towards the stage. Now hold foward so you lean as far forward as you can on the bike, your aim here is to basically cut the bike in half with the level. Now once again you will see the glitch where you have to flick up on the control stick. Do it, and you should see Wario spinning like mad! Wah-wah-WAH!!
Advanced usage of Bike Loops involves the "Wario Rocket" maneuver, which basically sends Wario flying 1,000,000,000 feet in the air via Bike Loop (with a hitbox that is SUPER STRONG). I am not sure exactly how this is done 100% of the time, but it seems to be connected to the position of the bike on specific parts of levels. For example, I'm pretty sure the nose of the bike has to be pointing upwards when you pass over the ramp on Halberd while Bike Looping, and BAM! you shoot up super high!
Masky demonstrates the "Forbidden Technique"!
A Bike Loop tutorial video by Pwneroni
16. ---Airdodge [Item] Drop---
About the Airdodge Drop: This technique is used to great effect by Toon Link players, and now the time has come for Wario players to look at it for themselves! When you perforom the Airdodge Drop, you go into your dodge animation and drop the item you're holding. This is very useful for Toon Link, because his bombs are explosive and leave the enemy stunned after they get hit. With Wario's tires, it may be a bit different. Tires are not explosive, but they have bouncing properties and a good bit of hitstun.
How to do it: This is a fairly straightforward and simple input, all it requires is pressing the dodge button and A at the right time. With an item in your hand, airdodge and right when it starts hit A. If you timed it correctly, Wario should
dodge and drop the item at the same time.
This technique is very much unexplored by Wario players, but it's easy to see where this can go. Out of a shorthop, you could dodge an attack and drop a tire on someones head or set a trap at the same time! When you are recovering from above with a tire in your hand, you could score some % by airdodge dropping the tire when your opponent tries to hit you. Solid!
17. ---Z Catching---
About Z Catching: An extremely useful technique for Wario, and even better: Super easy to learn!! Z Catching is so simple, I will forego a "how to" section and just tell you right here. All you have to do is press Z when you're near an item in the air, and you will instantly catch it with no lag!
This works with any character, and on most items in the game. Z Catching has tons of depth and applications to Wario yet to be explored, just have fun with it and see what you can find!
18. ---Footstooling---
About Footstooling: This technique is really quite an interesting addition to the Smash series. Basically you jump off of someone's head, and they fall for a ways unable to do anything. If they hit the ground, they bounce and are unable to tech! This means that with footstools, you have a possibility for some guaranteed combos! Also there are grounded footstools, which is when a character is standing and you "trampoline" off their head, giving them a small bit of stun. Another possibility is a "Peter Pan" Footstool (dunno what the official name is), where you sucessfully jump off their head but they recieve no stun ala Snake's Cypher, D3's UpB, etc.
Footstooling has been explored by tons of characters, and thus tons of cool stuff has been found. But we're not here to talk about other characters, are we? xD Wario players have merely scratched the surface of this awesome technique though, and I'm making it my mission to explore the unexplored. Chart the uncharted. Tame the wild beast that is your opponent and make Wario THE MOST AWESOME CHARACTER IN THE GAME!
How to Footstool: Footstooling is really quite easy, all it takes is a bit of timing and pressing the jump button. If you are on top of someone (literally), you press jump and it will perform the action of footstool!
- If an opponent is in hitstun, or in the air not in dodge animation, a footstool will send said opponent downwards in a classic footstool.
- If an opponent is standing on the ground in stun or not blocking/dodging, you will jump off their head. This gives them a small bit of stun, and the only damage you can possibly score out of this is if you have an item in your hand and you Dthrow it on top of them. *Fun Fact!* If you are dizzy from a shield break, this grounded footstool gets rid of your dizzy immediately. Useful if you and a friend are testing out stuff and someone's shield breaks.
- In certain situations, footstooling someone will give you a jump but not stun them. When an opponent is shielding on the ground, and during Snake and D3's UpBs are some examples.
Now the real money with foostooling is what you can do after you've sent them downwards (aerial footstool). The person you footstooled will bounce on the ground, unable to tech. Now they are prime targets for jab locks, tire locks, laser locks, weak Nair locks, fireball locks, you name it. Basically you can keep bouncing them with a combination of moves, and they can be forced into a normal get-up. This is only just beginning to be explored by Wario players, use your imagination and have fun with it!
19. ---Stutter Stepping--- *Thanks to xzx and Reflex for their contributions!*
About Stutter Stepping: A fairly simple technique, but it can be very useful when used in the right situation! It basically involves canceling your dash animation with a move, most commonly Fsmash BY FAR, and boosting the range of that move by a little bit. Really quite good as a spacing tool, it gives Wario's Fsmash a little more range than it normally would. Sure it's small, but it's not the size that counts after all, it's how you use it.
Clarification needed for forwards or backwards dash cancel influences on Fsmash.
How to do it: Very simple inputs. First, smash over to dash. Then, hit over on the c-stick to Fsmash! It's a really quick input, you only want to get the first few frames of the dash because after that you are unable to cancel it. xzx has provided us with a cool video showing the distance difference between a normal Fsmash and a stutter stepped one!
A Stutter Step/Extended Fsmash tutorial by xzx! *He says in the beginning that you press over and Fsmash at the same time, but theres a teeeeensy bit of space in between the inputs!
20.---Quarter Circle SDI (QCSDI)---
About QCDI: This is an advanced version of standard Smash Directional Influence (SDI). Thanks to Brawl's buffering system, wiggling the control stick in the direction you want buffers a bunch of inputs, rather than just one. This means you can SDI out of multi-hit moves (Mach Tornado, MK's Fair, Bair, D3's Uair/Dair, etc) more quickly and reliably, allowing for better punishing and follow ups.
How to do it:You see, with conventional SDI you simply smash in one direction when you are hit. To perform a quarter circle input, wiggle the control stick back and forth the direction you want: Think of a classic clock, 12 at the top, 3 on the right, 6 on the bottom and 9 on the left. A quarter circle would be 1/4 of that circle, for example from 12 to 3 or 6 to 9. You can basically pick any 3 hours next to each other, for example 10:30 to 1:30 for upwards QCSDI.
21. ----Dthrow to Buffered Dtilt----
About Dthrow to Buffered Dtilt: Wario's Dthrow is a very interesting move, indeed. He sits on his opponent, and they come out behind him at a very small frame disadvantage. The good thing about this throw is that you can utilize Wario's small frame advantage to score a small combo into Dtilt, which then has better follow up options than a simple Dthrow by itself.
Wario's frame advantage from his Dthrow is very small. In fact, you could probably count the number of advantaged frames on one hand. Now there are only 2 moves that come out that quick for Wario on the ground: Grab and Dtilt. Dthrow to regrab is possible on several characters, and the same goes for this technique.
I'll add in some pictures later. Wall of text ftL haha.
Now, I could use everyone's help making a list of all the ATs out there that Wario can do! All the way from basic ones like DACUS to advanced ones like Bike 360s and awesome tire stuff! I
decided to include tire combos as well, and these aren't any old regular combos. Only strings either guaranteed or almost guaranteed can be included.Oh almost forgot! To help new Wario players, I'm aiming to explain how to DO all the ATs also. I remember one time, I tried playing Sonic for a while. When I went on the boards to look at his ATs, there were a million and one but none of them were explained! A small write-up (like a paragraph or two), detailing the inputs, timing and useful situations would be great for each one
Vids too, I daresay? Wario exclusive? :O perhaps for the more complex ones heh.
Basic Techniques
Tire or Bike Techniques
More Complex Techniques
Special Buffered Techniques
1. DACUS*
2. **** DI
3. Edge Crashing
4. Platform Canceling*
5. Instant Throwing
6. Glide Tossing
7. Zibble Dropping*
8. Platform Drop Jumping
9. Platform Drop OoS
10. Buffered Dthrow Chaingrab
11. GTEX DACUS*
12. Optimal Breaking of the Bike*
13. Buffered DACUS
14. Chopper Hop
15. Bike Loops!*
16. Airdodge [Item] Drop
17. Z Catching
18. Footstooling
19. Stutter Stepping
20. Quarter Circle SDI
21. Dthrow to Buffered Dtilt
* = video or tutorial available
New Addition: The Tire Section (in the second post slot)
1. ---Dash Attack Canceled Up Smash (DACUS)---
About the DACUS:The DACUS is a moderately useful technique, utilized by many other characters than Wario. Wario's DACUS is on the quicker side, so you can use it to tech chase after throws or hits, and you can punish MK's tornado if the opponent tries to poke in then pull back. The downside though, is the Usmash itself is fairly easy to SDI. If the opponent is competent at Smash DI, then they will have little trouble getting out of this hit. However, you can use this to your advantage! Opponents who try to punish may still find you out of their reach, and you can punish with a grab, Ftilt or Fsmash!
How To Do It
Wario's DACUS is quick, and so are the inputs. Do an instant Dash Attack by dashing and hitting down on the c-stick. RIGHT immediately after you Dash Attack, hit up on the control stick and press z. I'm talkin really fast here. Before the dash attack even comes out, you have to be pressing up and z. You can hold z to charge the smash, trading the fluidity and quickness of the move for a bit of extra distance.
Thanks to 1337PGN for this helpful video on DACUS!
2. ---Having Super **** DI---
About Kick-*** DI: DI is a fairly basic and awesome technique! It maximizes the survivability in lots of different scenarios, most notably the predictable smashes that Wario has to face out of grab release. EXTREMELY USEFUL to a Wario player, I urge you all to practice this with a friend in training mode. In this lesson, we will explore a little on how to survive smashes with maximum effectiveness.
Basically when you get hit, there is a window where you can Smash DI. If there is more than one hit, you can SDI each one! DI uses both the control stick and the c-stick, SDI'ing the initial hit and circling to DI with the control stick while monentum canceling with the c-stick. Let's go step by step.
How to do it: Okay let's say you just got grabbed by Bowser, and he's going to hit you with a grab release to Usmash. Here comes the grab release, aaaand boom he starts his Usmash. Now you should be waiting for that Usmash, because you have to be quick. RIGHT when he hits you, Slam both the control stick and the c-stick diagonally downwards, opposite of the way you're going to DI, at the same time. You should see yourself teleport downwards. Now immediately circle the control stick to the left or right (depending on which way you want to fly) for conventional DI, and mash down on the c-stick for your momentum cancel (Dair in this case). Remember, the movements must be really quick! Slam both the sticks down, and immediately move them to their proper positions for DI. Practice this a lot, it can only do you good
You can survive Bowser's Usmash until 118% exactly using this method on FD.. Learning to SDI helps a lot in these scenarios! It can help you get that extra space for surviving to higher percentages. Like SDI'ing down and diagonal left, then quickly circling to DI to the right. Makes the heavy Frenchman even heavier heh heh.
3. ---Edge Crashing---
About Edge Crashing: This is a technique used to safely crash the Wario Bike onstage, allowing you to make use of it to acquire tires, throw the bike itself, or get on and ride it again. This is very useful on many stages, as obviously the bike is a wealth of potential in itself. More on that later. Much more.
This technique is great, because in edgeguarding scenarios it puts you in great position to throw the bike out at the opponent. It is pretty quick and fluid, and once you practice it you can seamlessly incorporate it into your playstyle.
How to do it: This technique is pretty simple. Let's do it on a simple level: Smashville. Start right at the edge of the stage, run off and bike towards the stage. Make sure you drop a tiny bit, but not too much. The end result is Wario and the bike both end up on the ground right next to each other. If you crash and fall down, that means you've fallen too far and must bike a little faster. If you just ride onto the stage, that means you haven't gone down far enough and must go a little bit further. The distance is pretty lax, not strict at all.
On some levels with weird edges, Edge Crashing requires more strict timing or is impossible altogether. Some examples of weird edges are PS1, Yoshi's Island and Lylat Cruise.
More advanced versions of Edge Crashing are simply crashing the bike successfully without preparation, in the midst of battle. It is very intuitive and easy, a gateway into the wonderful world of Wario's motorcycle!
4. ---Platform Canceling---
About Platform Canceling: Only useable on levels with a moving platform, this technique has yet to be explored by Wario players. Basically it involves jumping up to a platform, and canceling your Dair before it even comes out. The end result is an instant landing on the platform, rather than jumping above it and landing. It can increase the speed of your game if you do it right, but at the moment it is a treasure chest of untapped potential for Wario.
How to do it: The easiest level to do this on is Smashville, where a flat moving platform is present. Start below the platform on the ground, and fullhop up to the platform. Right as you are ascending through it from below, hit down on the c-stick to start your Dair. The objective here is to land on the platform before the Dair ever comes out, thus canceling it into an instant landing. It is possible to do this with other aerials, but Dair is easiest because it auto fast falls.
It is possible to do this at any point, you don't have to be on the ground to do it. You can Platform Cancel whenever you want, you just have to fast fall an aerial at the right point. The timing is fairly strict, but it's no Street Fighter 4. Wario has very little lag when he successfully pulls this off (as much as he would have with a regular landing). Common stages you can do this on are Smashville, Yoshi's Island and Lylat Cruise.
The most useful thing I've found for Wario is Platform Canceling out of a ledge jump. When the moving platform is above you, ledge jump and Dair at the right time. Anyone wanna explore this one?
Credits to StarChileRoan for this video on platform canceling!
5. ---Instant Throwing---
About Instant Throwing: This technique is a really great one to learn if you want to get good with tires. It allows you to instantly create a hitbox, throwing a tire instantly as you come near it (it cuts out the time of you picking up the tire). You can give still items movement, throw back items thrown at you, and really it's great for speeding up your game and adding some flash to it. Works with any item!
How to do it: The timing is a bit strict on this one, but very intuitive and easy once you get it down. Easiest to do with L and c-stick (assuming you have vanilla controls). Let's say there is a tire bouncing on the ground in front of you. Jump and airdodge to catch it. Notice how you instantly catch the tire, then go through with the entire dodge animation. The goal here is to cancel the airdodge with a throw exactly as you catch it.
Basically you have to press dodge and c-stick in a direction almost at the same time. Jump and dodge to catch the tire, then flick the c-stick down immediately after you dodge. If successful, you should instantly grab the tire and throw it down! A great place to practice this tech is on Shadow Moses Island. The walls on either side make a great place to play with tires, since if a tire is in motion it won't disappear. The walls keep the tires in, so basically one tire will last you forever! Practice throwing and catching against the walls, ground, keep practicing till you get it down!
6. ---Glide Tossing---
About Glide Tossing: A technique developed fairly early in the metagame. It involves canceling a roll animation with an item toss, giving you a boost. Really useful for characters that can spawn their own items (Peach, Diddy Kong, ZSS, ROB, Wario). Not everyone has one, but Wario has a pretty great one! His long throw animations detract a little bit from the usefulness of this AT, but it is still useful nonetheless.
How to do it: To do this with Wario, you must have an item in your hand. Any item will do, in this case we will use a big tire. What you have to do is roll, but right as you roll you have to toss the item with either the control stick and A, or the c-stick (In this case we will use the c-stick). The timing is very tight, you almost have to press roll and hit the c-stick at the exact same time. If you miss the timing, Wario will still throw the item but he will go a very very tiny distance.
The Dthrow glide toss is arguably the most useful one, since it is the quickest to come out and has the least amount of lag. A really awesome thing to do is glide toss a tire down and Fsmash the opponent from behind. More exploration needed!
7. ---Zibble Dropping---
About Zibble Dropping: I found this AT the other day when I was practicing with tires, and it seems to have a good deal of potential. I dubbed it "Zibble Dropping" because it is a tire dribble and involves the Z button. You do this tech by shorthopping and throwing the tire down (either big or small) and then buffering a z catch immediately. The end result is another hitbox being created after the initial dthrow hitbox. This means that you can hit with a dthrown tire, Zibble drop and make the tire have another hitbox. Loads of potential
How to do it: Very simple and easy to pull off! Grab a tire, any size will do. Be warned that while you can do this tech with either size, only the big tire can be Zibble Dropped after you dthrow it to hit someone. Do a shorthop and dthrow the tire, buffering a z catch as you throw. The buffering window is really huge, so timing is very easy. There is a weird point where when Wario tries to z catch something, if the item is just at the right range below him, it will instantly catch the item, drop the item and airdodge. Dthrowing the tire puts it right at this point heh (destiny anyone? xD) You can Zibble Drop after you hit someone with a shorthop dthrown tire, creating another hitbox for the tire. Very useful!
Example of a combo: This one I made up is called Pinball Wizard (thanks to t0mmy for the name). It makes use of two tires, as well as the Zibble Drop. To start, a tire (either size) has to be bouncing behind your opponent. Shorthop and dthrow the (big) tire at them. After it hits, Zibble Drop and start an Fsmash. The opponent should get hit with the first tire, then get hit with the tire bouncing behind them. Then they will bounce towards you and get hit with the Zibbled tire. Unleash your Fsmash. Does around 40% and looks cool as hell
works at any percent since the tires have set knockback. More to come!A Zibble Dropping Tutorial by Pwneroni
8. ---Platform Drop Jumping---
About Platform Drop Jumping: Wario's slow jump keeping you down? His jump from the ground is 6 frames for the start-up, airborne on the 7th frame. This is very slow (most characters jump on frame 4-6, Bowser is the slowest jumping on frame 8), and sometimes it can leave you at a disadvantage. By utilizing a platform drop (1 frame) plus double jump (1 frame also), you can significantly speed up your jump!
How to do it: A platform is needed, any one will do. Basically you are just dropping down through the platform, and jumping at the first possible frame. It's a really quick movement, and if you do it right you should hardly fall through the platform at all. The double jump disk should be above the platform you're using, and you should be free to do any aerial that you like! If you do it perfectly, Wario's jump will be cut from 7 frames to 2 frames. You cannot short hop or full hop, as you are using the double jump and can only jump that distance.
Exploration is needed for this technique! Especially if you pair it with a platform drop out of shield, this could be an amazing step for Wario in terms of jumping speed, out of shield options, follow ups and surprise attacks!
Example use: MK is Dair camping from above, fairly close to you. Normally he has enough time to Dair then jump away because of your slow jump. Platform drop jump to Uair for a quick punish before he can pull away! Haven't tested much out, testing needed!
9. ---Platform Drop Out of Shield (OoS)---
About Platform Dropping OoS: Similar to the Platform Drop Jump, this AT is a tad bit more difficult to perform. However, it's uses far outweigh any potential complaint like that! It gives Wario a really great out of shield option while he's on a platform. Normally, if pressured from below Wario is kinda out of luck. His jump is his best option to get away, and that's 7 frames plus more for shield dropping. That means getting away will take forever!
With platform drop OoS, Wario now has a really quick option available to him! The platform drop OoS is similar to the regular platform drop, in the fact that it only takes 1 frame! Way freakin faster! Pair that with a Smartfart and you have a 6 frame OoS option 0.o WOW! Now the difficult part is pulling it off, which brings me to...
How to do it: This technique could be done in both Melee and 64, but it was significantly easier. In Brawl, it's just as simple as pressing down while in your shield on a platform. However, the movement on the control stick is very precise! If you press down too hard, it will input a spotdodge. If you press down too softly, it will just angle your shield downwards. You have to tilt the stick down at the exact right pressure, and you will do a platform drop oos! Practice, practice practice!
Uses for Platform Drop OoS: Let's say Snake or D3 is standing below you, and you are on a platform above them on Battlefield holding your shield. Boom, they try an Utilt against you, and you successfully shield the blow. Normally, you're stuck in shield stun for 8 frames, a shield drop (7 frames) to platform drop attack will get shielded and punished. Normally such an attack is unpunishable. Normally.
Shield the Utilt, platform drop oos to fart. Utter destruction. If you don't have a fart ready, substitute in a Bite or Uair! Not sure if those would hit, but as always it could use more testing!
Next step.... Perfect shield to platform drop OoS Smartfart. I'm gonna call that one Greased Lightnin'. Couldn't resist
10. ---The Buffered Dthrow Chaingrab--- *Brought to you by FICTION!*
About the chaingrab: Wario's Dthrow is great and very unique. It has property unlike many other grabs; it has a set knockback PLUS you have a very slight frame advantage. Using these two properties together, you can chaingrab many characters by buffering in a turnaround regrab! It may sound daunting, but the point of this thread is to make stuff like this accessable to everyone!
A lot of these are in a specific percentage range, and keep in mind that staling out your Dthrow is required for specific characters. Staling the Dthrow means that the more you use it, the less distance it will put them away from you. The change is very small, neigh unnoticeable to the naked eye. In a frame perfect world though, every pixel counts. Take Falco for example... technically our chaingrab on him starts at 53% right? You can actually successfully start the chaingrab at 73% and still keep going along with the chaingrab. However, if you try to chaingrab Falco over 73%, he can get away because your Dthrow is not staled enough. If you practice this chaingrab in training mode, you can only go up to 73% since moves don't stale in training mode.
List of chaingrabbable characters in progress... credit goes to K Prime for confirming the exact percentages! The original thread is ---HERE!!!--- and his original blog on AiB about it can be found ---Here!!!---
Falco - 53% to 120%
Donkey Kong - 0% to 100, 110% to 145%
Bowser - 0% to 180%
Falcon - 0% to 70%
Wolf - 59% to 200%
Ganondorf - 0% to 90%
How to do it: I would tell you how, but our good old friend Fiction (Best Wario Ever) has kindly posted EXACT instructions on doing the chaingrab. Thank you Fiction, and all credit for this section goes to Fiction.
---11. Glide Toss Extended DACUS (GTEX Dacus)---instructions:
please read the whole post!
[separate from actual technique]
1.dthrow opponent
2.hold shield so that it comes out on earliest frame
Do this a few times so that you see how fast your shield comes out during the throw. To actually buffer a reverse grab, you will need to do it in the last 10 frames (6th of a second) before your shield comes out. Its nasty hard till I teach you some tricks on how to do it XD
Actual Steps
1. dthrow opponent
2. HOLD back on the control stick (i just roll it back after the dthrow, you dont have to do this very speedily since the dthrow animation is pretty long lol).
3. as falco (the hardest one so just work with me here XD) comes into the buffer zone, RELEASE the back that you were holding on the control stick and press the grab button within a short amount of time.
4. AFter waiting a split second (Feels like online latency sorta) wario will turn around and grab the opponent again.
Troubleshooting
Scenario 1: your shield comes up
-This means that you press the grab button too late
Scenario2: Wario turns around without grabbing
-This means that you released back on the control stick at the right time but you pressed the grab button before the buffer frames were active.
Scenario3: Wario grabs behind him, but falco has time to roll away
-Either you are starting too early....(53 is the earliest)....or you are not correctly buffering a grab. Instead you may be buffering just the turnaround then then initiating a grab on one of the opening frames after the dthrow, allowing falco those few pesky frames he needs to get away.
Tips for testing
-This is best to first test in training mode. It works from around 55-84 (i dont remember the exact percentage). If you want the falco to try to get out, put him on lvl 9 and set him to attack. he should b easy to grab haha.
-When testing it in regular mode, I find it easiest to set the handicap for falco at 50 percent. I go to FD, run up and grab falco. Grab attack him twice, and he will break out exactly at 53 percent. Grab him again and begin cging.
Learning the timing
So far I have seen three different ways to easily time the buffer besides just getting it in muscle memory.
-You can watch warios hands. As his fists get smaller and he gets up should be the correct window for a buffer.
-You can watch the opponent. As falco is about 15-20 degrees in relation to the ground (just above it) is about the buffer range. Hes still in his un-DIable animation thing.
-The michael haye method: he apparently listens for the sounds that the throw makes and bases his buffer timing off of that. I can't do this method but it might work for other people.
Hope I helped guys XD.
About the GTEX: Wario's Glide Toss is becoming more and more dynamic and useful the more it is explored. Especially the Dthrow glide toss, which has the smallest amount of lag of all the glide tosses. Pairing the distance of the glide toss with the distance of the DACUS, Wario can literally FLY across more than half of FD in a few quick moments! Doing this allows you to cover massive amounts of ground very quickly, and it's as simple as combining two ATs! :D
How to do it: This is quite simple, really. All it requires is a long tire glide toss (Dthrow is good for this one), then you just input a DACUS at the soonest possible time available! Remember, the Dthrow glide toss's timing is pretty strict, you basically have to push the shield down, control stick over and the c-stick downwards almost exactly at the same time.
Video Tutorial: Tires Give You Mobility!
*New Discovery!* - A regular Dacus can be replaced with a Buffered Dacus, or bDacus for short. This increases the speed of the GTEX, since it is the fastest possible timing! Thank you to S!C for this helpful information!
12. ---Optimal Breaking of the Bike---
About Breaking the Bike: Many Wario players know of the great tool Wario has, or are soon discovering it: Tires. Tires are great for stage control, traps and combos. They give the fat man the range he so much desires, but one must ask: how do you get these tires? Well that's an easy one, pull out your bike and hit it! Once the bike is destroyed, the two tires fly outwards onto the stage for you to grab. Now that's the basic idea, but we're going to take it a step further. What is the most optimal way to get tires?
There are literally hundreds of ways you can break the bike, and to determine which one is best for you, you must step back and think. Every time you hit the bike, it counts as a hit against a character. Thus, you can unstale your strong moves by hitting the bike with unused moves! There are fast ways if you need tires quick. Tires flying all over the place, even off the edge into the abyss? The move that breaks the bike determines the trajectories of the tires when they fly out! Edgeguarding? Yes, there's **** ways to cover multiple recovery options using the bike, and bring down it's hp at the same time!
The first basic step is getting the bike onto the ground. The fastest way to do this is to do an Instant Wipeout, meaning you pull the bike out and instantly crash in place. Nobody really knows how to do this consistently (if you do, let me know!) though, so until then Edge Crashing is the fastest and most consistent way to get your bike out. The next fastest is pulling out your bike and immediately jumping off, putting you in the air and your bike will keel over after it rolls for a bit.
Optimal Bike Breaking for Unstaling Moves
-Dtilt, dtilt, dtilt, repeat. Dtilt is farily weak (about 9% fresh), so you can hit the bike multiple times with dtilts to unstale your moves. A little bit hard to space, you have to be at the right range or you will A. miss hitting the bike or B. pick it up and carry it. Obviously you don't want that to happen as it might leave you open to be punished. Can also use Utilts, easier because there is no danger of accidentally picking up the bike.
-Nair2, Nair2, Nair2, repeat. The second hit of Nair counts for 1 move stale spot, and it only does 3-4% damage! If you have some spare time, use the second hit of Nair to unstale your strong moves a ton! Plus it's really quick, so your chances of getting punished are smaller.
Optimally Fast Bike Breaking
-Full Dair -> Utilt. Every hit from the (fresh) Dair must hit, then an Utilt will break the bike. Utilt is great because it's quick, medium strength, and most importantly it pops the tires right out in front of you. Utilt is definitely one of the best moves for last hitting the bike!
-Shorthop dthrow tire -> Uair. Important not to fastfall the clap, because it won't hit the bike if you do. This way is probably the fastest possible way to break the bike out of all of them. The Uair must be fresh, if it is staled at all then the bike will have a very tiny bit of health left. Uair is similar to Utilt, in that it puts the tires near you within easy reach.
The Bike on the Edge
A great way to get your bike on the ground quickly is to edge crash. This also puts you into a great position if you are edgeguarding your opponent. If you send them flying at high speeds off the stage but you know they won't die, think ahead and crash your bike on the edge. Now you have a very large tool to cover a VERY large area of space with a huge hitbox! Try Uthrowing the bike and grabbing the ledge. Effectively, both options are covered and recovering will become much more of a hassle for your opponent!
Every time your bike bounces (including bouncing on an enemy's head), it's hp goes down. Uthrowing the bike on the edge is very good against characters like Marth, Lucario, Olimar, Charizard, well the list goes on but basically anyone that can't fly, or has a crappy fly. If someone is hit with the bike while it's bouncing, it does around 12-15% per hit to them. That's right, I'm not even joking! The bike can also hit them multiple times, resulting in MASSIVE damage!!!
Keep in mind that Utilt and Uair are possibly the most useful "last hit" for the bike, as they place the tires very near you and with little movement. Do some exploration yourself, and see if you can find even better ways of breaking the bike!
Thanks to Krystedez for this helpful thread about "The Krying Chopper"
Thanks to TheRealBobman for making this AWESOME Wario guide on Allisbrawl! Part 3 is all about the bike, very useful information about the bike's priority, hit points and stuff like that!
Video Tutorial: Tires Give You Mobility! The bike breaking section is near the end.
13---Buffered DACUS (bDACUS)---
About Buffered DACUS: The bDACUS is the next level of DACUS usage. It basically means you buffer in a DACUS out of lag, so it does the move ASAP. This allows you to be frame perfect, increasing your overall speed that you can do the DACUS! Simple in theory, fairly simple to input as well! Has great potential for combos, follow ups, traveling across the stage and quick attacks.
How to do it: While similar to the DACUS, it is an entirely different input. When you do a move (any move will do! Examples include Nair, Spotdodge, Glide Toss, Uair, any move's lag really), you have to buffer a dash Usmash, and then another Usmash within the 10 frame buffer window. Simple in theory, you just have to have really quick fingers to do it. Press over on the control stick and up on the c-stick, then hit up on the c-stick again REALLY fricken fast when you're in lag or out of a spotdodge. Try it out for yourself! Oh and a special note, you have to be facing forward to do a bDacus.
LOL I found the best bDacus! Better than I can do atm, it's even Wario exclusive! Credits to BrawlHumpy for this awesome vid!
14.---Chopper Hop--- *Brought to you by Krystedez!*
About Chopper Hopping: Originally discovered by Wario Bike Magician Krystedez, this is a simple technique that creates airborne movement very quickly from a stationary bike. It's great in situations where you need to reposition your bike, and at the same time be safer than just getting on the hog and riding away. Krystedez has written up a great explanation of this tech all credit goes to him!
Originally Posted by Krystedez
"from your description"...
Omgosh, you know what, just do it yourself? Mhizzle did it.
Let me explain CAREFULLY.
You have a bike next to you. YOU'RE NOT RIDING IT. It's just laying there. You think you can do one of two things that involve handling the bike:
Ride it.
Pick it up and throw it.
But, you think... "I wish I could have it in the air right now with me on it... I could smack that guy over there with it while he jumps at me... I could even just move the gosh darn thing because it's not good in the middle of the stage... Since it's on the ground, I can't do that until it's gone and I just pull it out of thin air with foward B in the air..."
But then, you realize something...
"Wait, I'm the great Wario! I can do anything! Who cares if it's on the ground already! I'll ride into the sky with it anyways!"
You can't:
A. throw it, and jump on it in midair, brawl's physics do not allow that...
B. Ride it, and THEN jump... Again, brawl's physics, plus the fact you can't jump with your bike while riding it, you just jump off :|
So what do you do?
C. Short hop very fast while at the same time reaching for your forward B motion in order to ride the bike.
IF YOU PICKED C.... The result is Wario jumping onto his bike just like he would when re-riding from the ground, ONLY HE JUMPS INTO THE AIR AT THE SAME TIME WHILE RIDING IT. It's like he kicks himself AND the bike into the air while riding.
Get the picture now? If you don't, I'm sad. If you already know about this, good, I'm glad, because I didn't, and now I do. Didn't find immediate use for it until I used it in finals at a tournament, it helped me get it on top of the platform in Yoshi's Island without damage in the bike by just throwing it up (it takes hit points each time it bounces off of the ground or lands on the ground from throws I believe)... This method is like this:
Chopper Hop -> jump off, bike is now thrown in the air by riding it without taking its HP or picking it up. It's like a lagless throw just as much as an bike boost jump.
Full Chopper Hop: It has been discovered that you can add to the height of your chopper hop by using a full jump instead of just a normal jump! To do this, you will need to hold the jump button and hit side B all within the normal Chopper Hop input window!
zxz was kind enough to record a video about all the different ways to utilize the Chopper Hop! Thanks xzx!
xzx presents a Chopper Hop video! (substitute the name "Double Jump Chopper Hop" for "Full Jump Chopper Hop")
15. ---The Bike Loop---
About the Bike Loop: Also known as Bike 360s, or the more famous "Forbidden Technique" made popular by Masky, this is an actual legit glitch in the game. It involves spinning Wario's motorcycle around on a platform, much to the enjoyment of spectators and players alike! Doing a Bike Loop during a match is guaranteed to get you a few laughs, even more if it's a money match or tournament set! Just don't get too carried away xD
How to do it: Okay, here's the real meat and potatoes of the Bike Loop section. Performing one is actually quite simple, you just have to get the timing down. The easiest place to start is Smashville, on the moving platform.
- Board the platform, and wait till it gets all the way to one side.
- Then, when it starts moving, bike away from the platform's path and turn around immediately. You should at this point be going very slowly forward on the motorcycle in the same direction the platform is going.
- As you near the edge of the platform, your front tire will start to dip downwards. Don't panic, this is supposed to happen.
Now is the crucial point. When you see Wario stutter a bit on his bike all glitchy like, flick up on the control stick. It's only for an instant, but the timing window is very obvious. All you need to do is flick up and that's it! ZZOOOOOOMMMMMMMmmmmmmmm!!!!!! You've done it! Yeeeeaaaaahhhh!!!!
You can do a Bike Loop on any level with a floating platform on it. This is level 2 Bike Looping, because the timing and inputs are a bit different than on Smashville. All you do is pretend that you're going to Edge Crash, so run off the edge, but fall a little bit further before you bike towards the stage. Now hold foward so you lean as far forward as you can on the bike, your aim here is to basically cut the bike in half with the level. Now once again you will see the glitch where you have to flick up on the control stick. Do it, and you should see Wario spinning like mad! Wah-wah-WAH!!
Advanced usage of Bike Loops involves the "Wario Rocket" maneuver, which basically sends Wario flying 1,000,000,000 feet in the air via Bike Loop (with a hitbox that is SUPER STRONG). I am not sure exactly how this is done 100% of the time, but it seems to be connected to the position of the bike on specific parts of levels. For example, I'm pretty sure the nose of the bike has to be pointing upwards when you pass over the ramp on Halberd while Bike Looping, and BAM! you shoot up super high!
Masky demonstrates the "Forbidden Technique"!
A Bike Loop tutorial video by Pwneroni
16. ---Airdodge [Item] Drop---
About the Airdodge Drop: This technique is used to great effect by Toon Link players, and now the time has come for Wario players to look at it for themselves! When you perforom the Airdodge Drop, you go into your dodge animation and drop the item you're holding. This is very useful for Toon Link, because his bombs are explosive and leave the enemy stunned after they get hit. With Wario's tires, it may be a bit different. Tires are not explosive, but they have bouncing properties and a good bit of hitstun.
How to do it: This is a fairly straightforward and simple input, all it requires is pressing the dodge button and A at the right time. With an item in your hand, airdodge and right when it starts hit A. If you timed it correctly, Wario should
dodge and drop the item at the same time.
This technique is very much unexplored by Wario players, but it's easy to see where this can go. Out of a shorthop, you could dodge an attack and drop a tire on someones head or set a trap at the same time! When you are recovering from above with a tire in your hand, you could score some % by airdodge dropping the tire when your opponent tries to hit you. Solid!
17. ---Z Catching---
About Z Catching: An extremely useful technique for Wario, and even better: Super easy to learn!! Z Catching is so simple, I will forego a "how to" section and just tell you right here. All you have to do is press Z when you're near an item in the air, and you will instantly catch it with no lag!
This works with any character, and on most items in the game. Z Catching has tons of depth and applications to Wario yet to be explored, just have fun with it and see what you can find!
18. ---Footstooling---
About Footstooling: This technique is really quite an interesting addition to the Smash series. Basically you jump off of someone's head, and they fall for a ways unable to do anything. If they hit the ground, they bounce and are unable to tech! This means that with footstools, you have a possibility for some guaranteed combos! Also there are grounded footstools, which is when a character is standing and you "trampoline" off their head, giving them a small bit of stun. Another possibility is a "Peter Pan" Footstool (dunno what the official name is), where you sucessfully jump off their head but they recieve no stun ala Snake's Cypher, D3's UpB, etc.
Footstooling has been explored by tons of characters, and thus tons of cool stuff has been found. But we're not here to talk about other characters, are we? xD Wario players have merely scratched the surface of this awesome technique though, and I'm making it my mission to explore the unexplored. Chart the uncharted. Tame the wild beast that is your opponent and make Wario THE MOST AWESOME CHARACTER IN THE GAME!
How to Footstool: Footstooling is really quite easy, all it takes is a bit of timing and pressing the jump button. If you are on top of someone (literally), you press jump and it will perform the action of footstool!
- If an opponent is in hitstun, or in the air not in dodge animation, a footstool will send said opponent downwards in a classic footstool.
- If an opponent is standing on the ground in stun or not blocking/dodging, you will jump off their head. This gives them a small bit of stun, and the only damage you can possibly score out of this is if you have an item in your hand and you Dthrow it on top of them. *Fun Fact!* If you are dizzy from a shield break, this grounded footstool gets rid of your dizzy immediately. Useful if you and a friend are testing out stuff and someone's shield breaks.
- In certain situations, footstooling someone will give you a jump but not stun them. When an opponent is shielding on the ground, and during Snake and D3's UpBs are some examples.
Now the real money with foostooling is what you can do after you've sent them downwards (aerial footstool). The person you footstooled will bounce on the ground, unable to tech. Now they are prime targets for jab locks, tire locks, laser locks, weak Nair locks, fireball locks, you name it. Basically you can keep bouncing them with a combination of moves, and they can be forced into a normal get-up. This is only just beginning to be explored by Wario players, use your imagination and have fun with it!
19. ---Stutter Stepping--- *Thanks to xzx and Reflex for their contributions!*
About Stutter Stepping: A fairly simple technique, but it can be very useful when used in the right situation! It basically involves canceling your dash animation with a move, most commonly Fsmash BY FAR, and boosting the range of that move by a little bit. Really quite good as a spacing tool, it gives Wario's Fsmash a little more range than it normally would. Sure it's small, but it's not the size that counts after all, it's how you use it.
Clarification needed for forwards or backwards dash cancel influences on Fsmash.
How to do it: Very simple inputs. First, smash over to dash. Then, hit over on the c-stick to Fsmash! It's a really quick input, you only want to get the first few frames of the dash because after that you are unable to cancel it. xzx has provided us with a cool video showing the distance difference between a normal Fsmash and a stutter stepped one!
A Stutter Step/Extended Fsmash tutorial by xzx! *He says in the beginning that you press over and Fsmash at the same time, but theres a teeeeensy bit of space in between the inputs!
20.---Quarter Circle SDI (QCSDI)---
About QCDI: This is an advanced version of standard Smash Directional Influence (SDI). Thanks to Brawl's buffering system, wiggling the control stick in the direction you want buffers a bunch of inputs, rather than just one. This means you can SDI out of multi-hit moves (Mach Tornado, MK's Fair, Bair, D3's Uair/Dair, etc) more quickly and reliably, allowing for better punishing and follow ups.
How to do it:You see, with conventional SDI you simply smash in one direction when you are hit. To perform a quarter circle input, wiggle the control stick back and forth the direction you want: Think of a classic clock, 12 at the top, 3 on the right, 6 on the bottom and 9 on the left. A quarter circle would be 1/4 of that circle, for example from 12 to 3 or 6 to 9. You can basically pick any 3 hours next to each other, for example 10:30 to 1:30 for upwards QCSDI.
21. ----Dthrow to Buffered Dtilt----
About Dthrow to Buffered Dtilt: Wario's Dthrow is a very interesting move, indeed. He sits on his opponent, and they come out behind him at a very small frame disadvantage. The good thing about this throw is that you can utilize Wario's small frame advantage to score a small combo into Dtilt, which then has better follow up options than a simple Dthrow by itself.
Wario's frame advantage from his Dthrow is very small. In fact, you could probably count the number of advantaged frames on one hand. Now there are only 2 moves that come out that quick for Wario on the ground: Grab and Dtilt. Dthrow to regrab is possible on several characters, and the same goes for this technique.
How to do it: When Wario performs his Dthrow, it is possible in the last 10 frames of the move to input your next moves. This window is right as Wario is clenching his fists during his Dthrow. 10 frames before his animation ends, input a turnaround then a Dtilt. If you buffer the move correctly, Wario should do a really quick turnaround Dtilt that will connect if the percentages are right. It definitely takes practice!Aight here we goo
Dthrow to buffered dtilt works until certain % on these characters
67%
Ill update soon with more characters
I'll add in some pictures later. Wall of text ftL haha.